Cześć! That’s hello in Polish!
My parents were both first generation children of European immigrants. My mother’s parents hailed from Germany, and that was the culture we spent most of our childhood immersed in. When I was young, my parents were members of a “German Club” in our city. My sisters and I were brought along to learn the language, songs, and dances of our maternal grandparents’ homeland.
We did not have the same opportunity as children to delve deeply into our father’s Polish ancestry. After spending time learning how to use my father’s set of ruling pens, which helped me feel connected as an artist to the person he was in his career, I became interested in exploring some of his, and my, cultural heritage. Through my research into the traditional art of Poland, I came across the paper cut outs called Wycinanki.
I’ve seen these fantastic paper cut outs before, and identified them as folk art, but never knew their origin or history. The traditional Wycinanki were used beginning in the 19th century as home decoration. Usually, these colorful cut outs were hung on white walls and along ceiling beams to make the house more cheery. Dyed paper was recently made more accessible to people at that time, because technology had made it easier to create at a less expensive price point. People who weren’t wealthy, often those living in the countryside, used this paper to create the intricate Wycinanki designs, as other materials, like paint, were still very expensive.
In the 1800s, subjects were often those found in nature and everyday Polish country life. Flowers, people, animals, and village architecture can be found as common motifs in Wycinanki. Scenes were also created to celebrate and remember special occasions like weddings. They were removed every year, when it came time to whitewash the inside of Polish homes, and replaced with new Wycinanki.
The cutouts are symmetrical, with geometric shapes and the aforementioned design subjects (I saw so many roosters!). Sometimes the Wycinanki were layered by placing different colored cut outs on top of each other to make a more intricate design. The best tool available to create these designs were sheep sheers, which are large and sharp.
It seems incredible that such lacelike designs could be completed with no preliminary sketching, these mammoth scissors, and such basic materials. But I know, from research, practice, and observation, that artists are resourceful. If we have access to anything we could use to create art, then we will create art.
Of course, since the countries of Germany and Poland are geographically close, there has been historical cultural and artistic overlap, so I get to enjoy this style of art from both my father’s and mother’s heritage. In Germany and Switzerland, paper cut out art is called Scherenschnitte.
The Wycinanki created in Poland were large, intricate, and layered. I simplified this in my first attempt by choosing just one color for my motif and gluing it down onto another color paper. I made my own stencil and traced my design, to give myself more assistance creating this artwork.
Traditional Wycinanki artists worked completely freehand, but it’s ok to use the artistic tools and knowledge you have to make yourself more comfortable while learning a new technique. It’s ok to use the artistic tools and knowledge you have at any time in your artistic process! I wasn’t trying to recreate the exact conditions traditional Polish folk artists used in the 1800s, so I am happy with my choice to make my own stencil.

What you need to create this cut out art inspired by Wycinanki:
- Colored paper (at least two different colors)
- Scissors
- A glue stick
- A pencil (optional)
- Stencils (optional)
- A hole punch (optional)
- I first folded a sheet of paper in half and, using my stencil, outlined my design on one side, making sure draw something that would not require cutting away the entire folded section. When unfolded, the design will be symmetrical and I wanted to make sure it stayed connected.
- After I was happy with my design, I cut away the designated sections from my sketch. I also used a hole punch to get small circles in my design.
- When my first cutting was complete, I unfolded my paper to make sure I was happy with the result. If not, I could fold the paper again and make adjustments. Remember, be conservative in your first cutting, you can always cut more off later but can’t add the paper back once it’s removed.
- Once the design was complete, I applied glue to the back and placed it, glue side down, on a differently colored piece of paper.
And here are two more of my completed cut outs:
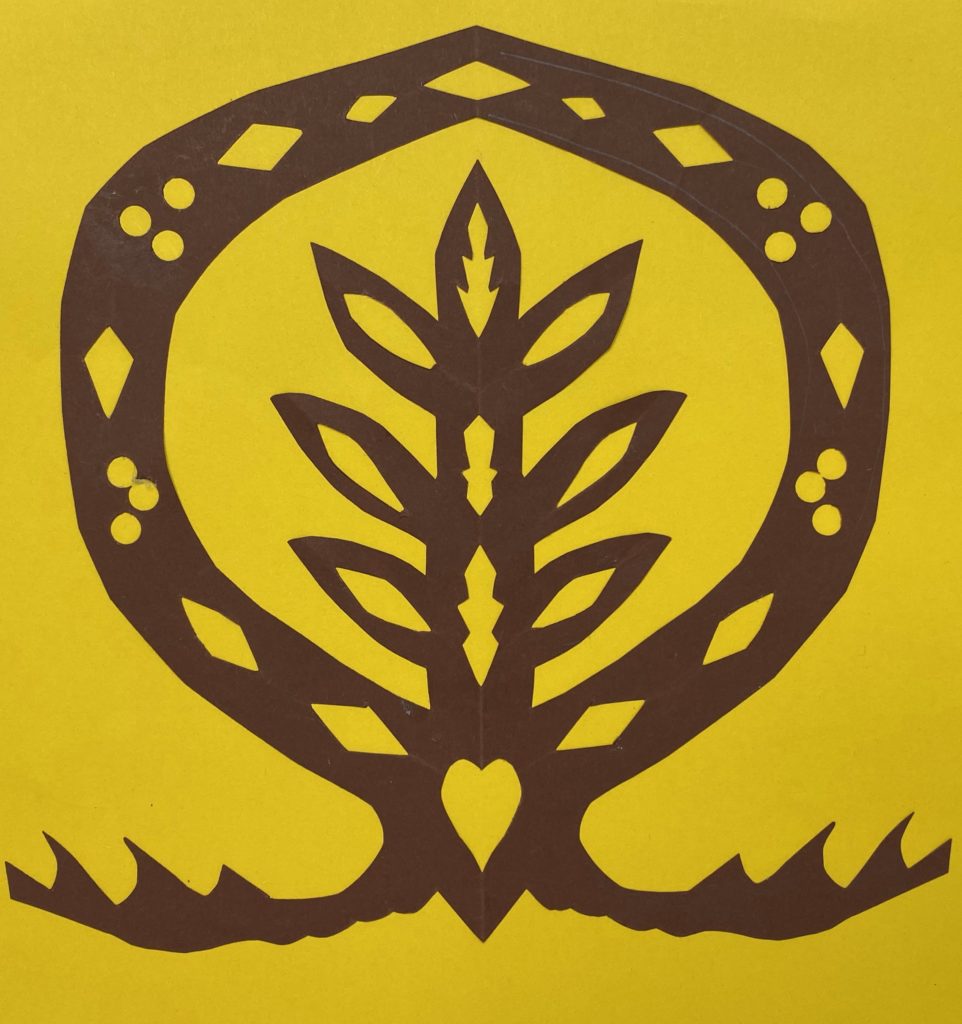
I accidentally glued the above cut out on backward, so you can see my pencil sketch marks.

If you’d like to try more complex designs, then try layering some designs on top of each other in the spirit of traditional Wycinanki. I’d love to see your completed projects, so please share them with me on Instagram, Facebook, or through email.
Na razie! Until next time!