
Create a Fisheye Effect in Astrophotography in 3 Steps

Good fisheye lenses are expensive and limiting, but there are ways in which we can create a fisheye effect without the lens itself. The result will be almost impossible to differentiate from a real fisheye image.
In this guide, I will give you tips to help you simulate a fisheye effect using a wide-angle lens, creating interesting and unique night sky photographs.
What is a fisheye lens
A fisheye lens is a type of lens that produces a wide-angle image with a characteristic circular distortion. This distortion occurs because the lens is designed to capture a much wider field of view than a standard lens, often as much as 180 degrees.
This wide field of view, combined with the circular distortion, creates a unique, fish-eye perspective on the world. Such a lens can be very useful in astrophotography when you want to capture the whole sky in a single image.
However, good fisheye lenses are expensive, and after a while, you might get bored with the same aesthetic and the lens will end up being used very rarely.
Simulate the fisheye effect
If you don’t want to commit to buying or renting such a lens for your astrophotography endeavours, you can simulate a fisheye lens pretty easily using a normal wide-angle lens and the steps below.
Read more: The Best Lenses for Astrophotography
1. Take a 360 panorama
You will start with a 360-degree panorama, and for that, you need a camera with a wide-angle lens. Something in the range of 14 to 24mm would be great.
You can do this with absolutely any lens, but the longer the focal length, the more individual frames you will need to assemble the final image.
Besides the camera and a lens, you need a very sturdy tripod. Be very careful with levelling the tripod as an unlevelled tripod will result in a slanted panorama.
You can use any tripod head, but I found it easier to do with a three-way head than a ball head. A special panorama head (the one that allows for the system to rotate around the nodal point of the lens) is not required, but you can use one if you like it better.
The first step is to take a 360-degree panorama around the horizon. For best results, overlap your individual frames by at least a third. A half would be even better.
Be sure to capture the sky up to the zenith (the point above your head). If your lens is not wide enough for that, shoot a multi-row panorama.
I would suggest shooting when the Moon is present in the night sky but has a small phase. This way, you will have the landscape nicely illuminated.
Read more: How to Take Panoramas of the Night Sky
2. Stitch your panorama together
Import the images in your RAW converter of choice and assemble them into a panorama.

It’s very easy to do that in Lightroom or Adobe Camera Raw.
Once the panorama is assembled, proceed with processing it. As I always recommend, be gentle with post-processing and keep a natural look.
Once you are happy with the result, export your image as a tiff or jpeg file.
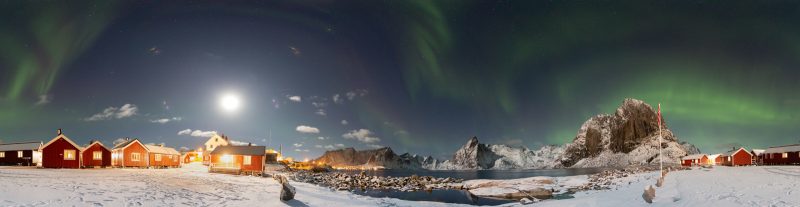
Now you have a beautiful 360-degree panorama.
You can show it like that, or you can convert it into an image that simulates a fisheye lens. Let’s see how we do that…
Read more: How to Edit Star Photos – First Steps to Processing in Astrophotography
3. Create a fisheye effect
To simulate a fisheye lens view in post-processing, you will need photo editing software such as Adobe Photoshop. The process involves transforming a standard rectangular image into a circular image.
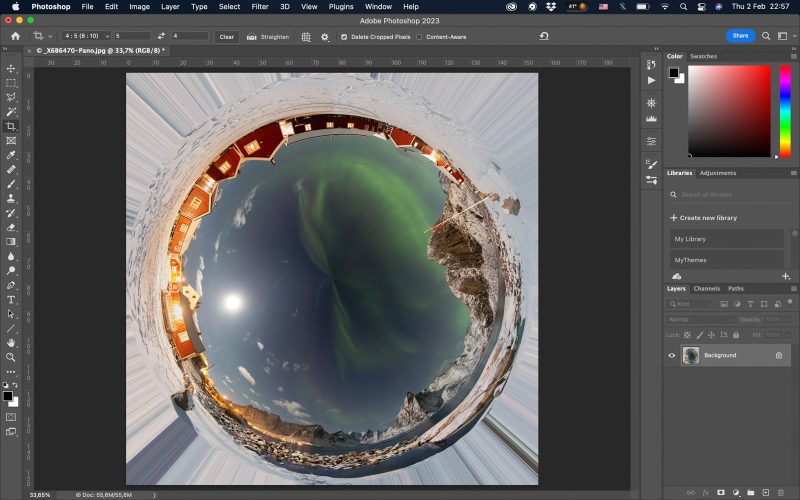
Open the image and Photoshop, then go to Image → Image Size.

First, deselect “Constrain proportions” by clicking on the chain link to the left of the “Width” and “Height” cells.
Then, in the width field, enter a value equal to the one in the height field. You will end up with a heavily distorted square image. Do not worry – we will fix that.

Now, go to Filter → Distort → Polar Coordinates.

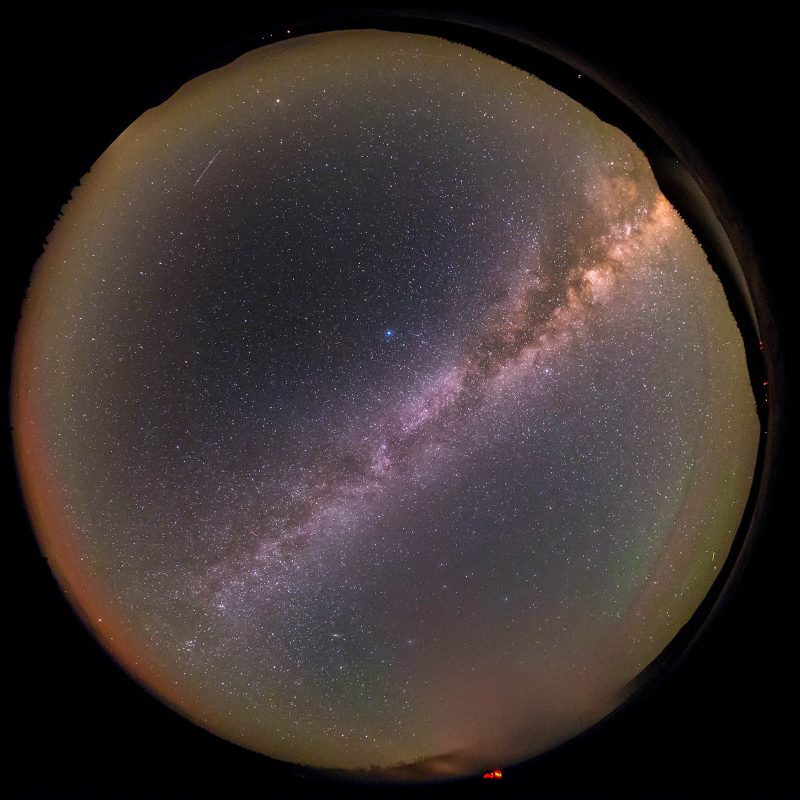
You just click OK and, like magic, the distorted square image transforms into a beautiful circular panorama that mimics a fisheye lens.
All around the circle, you will have some sort of rays as a result of the conversion.
As they are not very aesthetic and you don’t get that with a real fisheye lens, you can easily cover them.
Use the selection tool to choose just the circle and then invert the selection. Fill the newly selected area with black and there you are – an image identical to one taken with a fisheye lens.

Little planet effect
As long as we are here, let’s talk about another technique that produces some funny-looking images, but with quite a bit of success.
I am talking about “little planets”.
The little planet effect is a fun and creative way to showcase your panoramic images.
The little planet effect, also known as stereographic projection, is a popular effect used in photography to create a unique perspective of a scene.
The effect gives the image a circular, almost globe-like appearance, with the edges of the original image wrapping around to form a complete 360-degree panoramic view.
By following these steps, you can easily create stunning little planet images in just a few minutes.

You follow the same steps as for the fisheye simulations, but you take a different path after squaring the panorama.
Once you created the distorted square photo, you go to Image → Image Rotation → 180°. Click that and, obviously, the image will turn upside down.
Now, you go to Filter → Distort → Polar Coordinates as you did to simulate the fisheye view. Once you’ve completed that, your little planet will materialise on your screen, and you’ll feel a bit like the “Little Prince”.

Once you’re happy with your little planet image, save it and share it with your friends and followers.
In conclusion
Simulating a fisheye lens view can be a fun and creative way to add interest and visual impact to your photos.
Whether you’re looking to capture a unique perspective of the night sky, or just want to experiment with a new visual style, simulating a fisheye lens view is a great place to start.
Clear skies!


