News Headlines
- Thu, May 02
- Dragon's Dogma II rises as 3rd best-selling game of 2024 at US retail
- Thu, Apr 25
- Fallout 4 next-gen upgrade goes live
- Mon, Apr 22
- Take-Two confirms more layoffs, cancelled projects by December 2024
- Wed, Apr 10
- Microsoft and NetEase to (re)launch core Blizzard games in China
- Fri, Mar 22
- Helldivers II already top-selling game of 2024 in US during launch month

Installation
We're not sure whether if it was an oversight, but the case we got sent did not come with instructions. Considering this case is supposed to target the mid-higher end market, a manual is something that is expected, if not required. This usually wouldn't matter, but after having issues with the fan controller and getting it to work properly, a manual would have been greatly appreciated.
After having reviewed a whole string of toolless cases, it was a little odd to come back to a case that required a screwdriver again. This wouldn't count against the case as long as the entire process went smoothly.
Power Supply
We've seen one review online that stated that the ExtremEngine required the power supply to be installed upside-down. For what it's worth, we installed an Antec Truepower 550 the right-side up to test that theory. At least for our case, we did not have any problems with the power supply.
Hard drives
Here we did suffer the same problem as other reviewers - the holes on the hard drive were not aligned properly. The holes were about 2 mm off from where they should be, which would require an angled screw entry or a little drilling of the hole to properly align the screws.

Optical drives
It was evident the original chassis had some sort of toolless mechanism (perhaps it didn't work out?), since there was a bow-tie shaped hole which was not used. This time, the screws were aligned properly, and there were no issues installing the CD-Rom that we had lying around.
Expansion cards
Despite requiring a screwdriver, Aerocool did help the user here. Whereas many cases require some fancy screwdriver work to secure the PCI and AGP/PCIe cards, Aerocool has drilled holes on the side of the case to insert your screwdriver through so that the user can get a 90 degree perpendicular angle of entry to secure the cards. Nice touch.

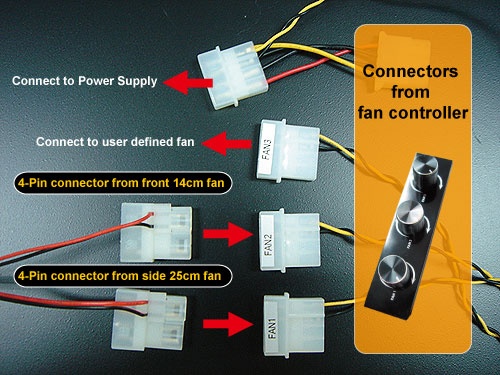
Fan controller
We complained about the lack of a manual earlier, and this was the reason why. While all the fans included with the case came attached with both\ male and female molex connectors, it seemed to imply that the male end of the connector would plug directly into the power supply while the female end would plug into the fan controller (which, to Aerocool's credit, was clearly marked fan 1-3). This clearly didn't work as the fans would run on full tilt the moment the power was turned on, with no effect from the fan controller regardless of the level.
Turns out you weren't supposed to plug the fans into the power supply at all. Had we had more experience with fan controllers in general, or Aerocool included a manual, this might have been solved without wasting half an hour of our time. After figuring this out, the fan controllers did work as expected, and there was much rejoicing. Only much later did we find out that Aerocool has a diagram up on their website, although at the time of testing I could have sworn it did not exist. For those of you too lazy to go look, here is the diagram.
Article Index
|
|