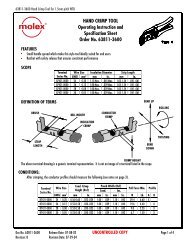
HAND CRIMP TOOL Operating Instruction and Specification ... - Molex
HAND CRIMP TOOL Operating Instruction and Specification ... - Molex
HAND CRIMP TOOL Operating Instruction and Specification ... - Molex

Create successful ePaper yourself
Turn your PDF publications into a flip-book with our unique Google optimized e-Paper software.
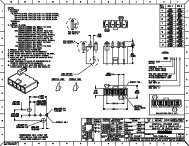
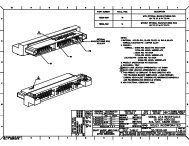
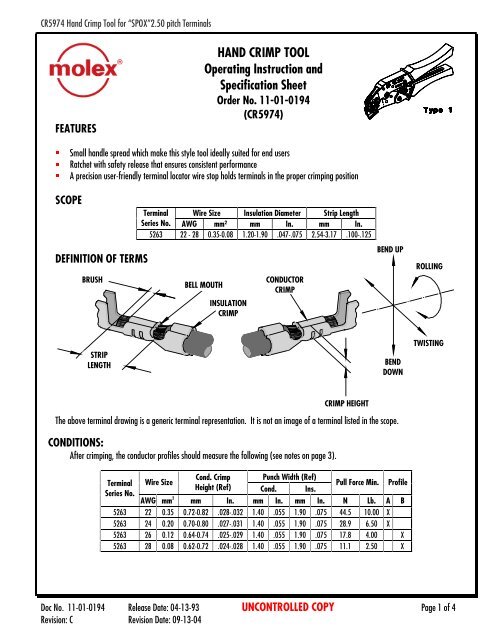
CR5974 H<strong>and</strong> Crimp Tool for “SPOX”2.50 pitch Terminals<br />
FEATURES<br />
BRUSH<br />
STRIP<br />
LENGTH<br />
<strong>HAND</strong> <strong>CRIMP</strong> <strong>TOOL</strong><br />
<strong>Operating</strong> <strong>Instruction</strong> <strong>and</strong><br />
<strong>Specification</strong> Sheet<br />
Order No. 11-01-0194<br />
(CR5974)<br />
��Small h<strong>and</strong>le spread which make this style tool ideally suited for end users<br />
��Ratchet with safety release that ensures consistent performance<br />
��A precision user-friendly terminal locator wire stop holds terminals in the proper crimping position<br />
SCOPE<br />
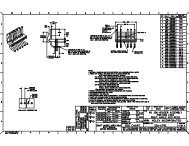
DEFINITION OF TERMS<br />
Terminal Wire Size Insulation Diameter Strip Length<br />
Series No. AWG mm² mm In. mm In.<br />
5263 22 - 28 0.35-0.08 1.20-1.90 .047-.075 2.54-3.17 .100-.125<br />
BELL MOUTH<br />
INSULATION<br />
<strong>CRIMP</strong><br />
CONDUCTOR<br />
<strong>CRIMP</strong><br />
<strong>CRIMP</strong> HEIGHT<br />
BEND UP<br />
BEND<br />
DOWN<br />
The above terminal drawing is a generic terminal representation. It is not an image of a terminal listed in the scope.<br />
CONDITIONS:<br />
After crimping, the conductor profiles should measure the following (see notes on page 3).<br />
Terminal Wire Size<br />
Series No.<br />
2<br />
AWG mm<br />
Cond. Crimp<br />
Height (Ref)<br />
mm In.<br />
Punch Width (Ref)<br />
Cond. Ins.<br />
mm In. mm In.<br />
Pull Force Min.<br />
N Lb.<br />
Profile<br />
A B<br />
5263 22 0.35 0.72-0.82 .028-.032 1.40 .055 1.90 .075 44.5 10.00 X<br />
5263 24 0.20 0.70-0.80 .027-.031 1.40 .055 1.90 .075 28.9 6.50 X<br />
5263 26 0.12 0.64-0.74 .025-.029 1.40 .055 1.90 .075 17.8 4.00 X<br />
5263 28 0.08 0.62-0.72 .024-.028 1.40 .055 1.90 .075 11.1 2.50 X<br />
ROLLING<br />
TWISTING<br />
Doc No. 11-01-0194 Release Date: 04-13-93 UNCONTROLLED COPY Page 1 of 4<br />
Revision: C Revision Date: 09-13-04
CR5974 H<strong>and</strong> Crimp Tool for “SPOX”2.50 pitch Terminals<br />
OPERATION<br />
Open the tool by squeezing the h<strong>and</strong>les together, at the end of the closing stroke, the<br />
ratchet mechanism will release the h<strong>and</strong>les, <strong>and</strong> the h<strong>and</strong> tool will spring open.<br />
Crimping Terminals<br />
1. Lift the locator blade <strong>and</strong> place the terminal into the correct die profile (A or B),<br />
release the locator blade. Not all tools are equipped with a locator or locator<br />
blade.<br />
TERMINAL<br />
2. Partially close the tool until the terminal is held in place, (See Figure 2).<br />
Figure 1<br />
3. Place a wire into the terminal <strong>and</strong> up against the locator blade, (See Figure 3). On tools without locators line the wire up with the<br />
conductor <strong>and</strong> insulation grips visually.<br />
4. Close the tool until the ratchet releases, (See Figure 4).<br />
5. Lift the locator blade or wire stop up.<br />
6. Carefully remove the crimped terminal.<br />
Maintenance<br />
It is recommended that each operator of the tool be made aware of, <strong>and</strong> responsible for, the following maintenance steps:<br />
1. Remove dust, moisture, <strong>and</strong> other contaminants with a clean brush, or soft, lint free cloth.<br />
2. Do not use any abrasive materials that could damage the tool.<br />
3. Make certain all pins; pivot points <strong>and</strong> bearing surfaces are protected with a thin coat of high quality machine oil. Do not oil<br />
excessively.<br />
4. When tool is not in use, keep the h<strong>and</strong>les closed to prevent objects from becoming lodged in the crimping dies, <strong>and</strong> store the tool<br />
in a clean, dry area.<br />
Miscrimps or Jams<br />
Figure 3<br />
PRE-STRIPPED WIRE<br />
Figure 2<br />
Should this tool ever become stuck or jammed in a partially closed position, Do Not force the h<strong>and</strong>les open or closed. The tool will<br />
open easily by lifting the ratchet release lever (See Figure 4).<br />
Doc No. 11-01-0194 Release Date: 04-13-93 UNCONTROLLED COPY Page 2 of 4<br />
Revision: C Revision Date: 09-13-04
CR5974 H<strong>and</strong> Crimp Tool for “SPOX”2.50 pitch Terminals<br />
How To Adjust Tool Crimp Force (See Figure 4)<br />
It may be necessary over the life of the tool to adjust tool-crimping force. Listed below are the steps required to adjust the crimping<br />
force of the h<strong>and</strong> tool to obtain proper crimp conditions:<br />
1. Remove the screw <strong>and</strong> washer. Located over the adjustment ring.<br />
2. Lift the adjusting ring slightly, off of the locating pin.<br />
3. Turn the adjusting ring in the desired direction (L= less force, T= more force) to increase or decrease crimp pressure.<br />
4. Press the adjusting wheel flat against the tool <strong>and</strong> engage the locking pin.<br />
5. Replace the washer <strong>and</strong> screw.<br />
6. Check the crimp specifications after tool crimp force is adjusted.<br />
Warranty<br />
This tool is for electrical terminal crimping purposes only. This tool is made of the best quality materials. All vital components are long<br />
life tested. All tools are warranted to be free of manufacturing defects for a period of 30 days. Should such a defect occur, we<br />
would exchange the tool free of charge. This will not be applicable to altered, misused, or damaged tools. This tool is designed for<br />
h<strong>and</strong> use only. Any clamping, fixturing, or use of h<strong>and</strong>le extensions voids this warranty.<br />
H<strong>and</strong> held crimping tools are intended for low volume, prototyping, or repair requirements only.<br />
Notes:<br />
Caution: Repetitive use of this tool should be avoided.<br />
1. This tool should only be used for the terminals <strong>and</strong> wire gauges specified on this sheet.<br />
2. This tool is not adjustable for crimp height, however crimp force is adjustable (See instructions above). Variations in tools,<br />
terminals, wire str<strong>and</strong>ing <strong>and</strong> insulation types may affect crimp height.<br />
3. This tool is intended for st<strong>and</strong>ard conductor sizes. It may not give a good insulation crimp support for all insulation sizes.<br />
4. <strong>Molex</strong> does not repair h<strong>and</strong> tools (see warranty above) The replacement parts listed are the only parts available for repair. If the<br />
h<strong>and</strong>les or crimp tooling is damaged or worn, a new tool must be purchased.<br />
5. Pull force should be used as the final criteria for an acceptable crimp. Pull force is measured with no influence from the<br />
insulation crimp. The insulation should be stripped long (1/2 in.) so the insulation grips on the terminal do not grip the wire<br />
insulation or the conductor. Refer to <strong>Molex</strong> Quality Crimping H<strong>and</strong>book 63800-0029 for additional information on crimping<br />
<strong>and</strong> crimp testing.<br />
6. <strong>Molex</strong> does not certify crimp h<strong>and</strong> tools.<br />
CAUTION: <strong>Molex</strong> crimp specifications are valid only when used with <strong>Molex</strong> terminals, applicators <strong>and</strong> tooling.<br />
Doc No. 11-01-0194 Release Date: 04-13-93 UNCONTROLLED COPY Page 3 of 4<br />
Revision: C Revision Date: 09-13-04
CR5974 H<strong>and</strong> Crimp Tool for “SPOX”2.50 pitch Terminals<br />
PARTS LIST<br />
M4 NUT<br />
LOCATOR<br />
BLADE<br />
Item Number Order Number Description Quantity<br />
1 11-11-0337 Locator Assembly** 1<br />
2 11-11-0324 Spring (Main) 1<br />
3 11-11-0320 Spring (Ratchet) 1<br />
1<br />
** Not all tools are equipped with a locator or locator blade.<br />
M4 X 18LG BHCS<br />
Figure 4<br />
<strong>Molex</strong> Application Tooling Group<br />
1150 E. Diehl Road<br />
Naperville, IL, 60563<br />
Tel: 630-969-4550<br />
Fax: 630-505-0049<br />
ADJUSTMENT<br />
RING<br />
Visit our Web site at http://www.molex.com<br />
RATCHET<br />
RELEASE LEVER<br />
Doc No. 11-01-0194 Release Date: 04-13-93 UNCONTROLLED COPY Page 4 of 4<br />
Revision: C Revision Date: 09-13-04<br />
2<br />
3